Thursday, December 28, 2017

Eddystone URL Encoding : A Beginner's Guide

For beginners who need to know how to convert url into UINT8_T, This can be a very helpful information:

To begin with, beginners need to know exactly what the URL frame contains and here is the details:

The first 9 bytes of the frame are just prefix. To check the content of the prefix value, see the picture below:


The 10th and 11th byte is constant having the value "AAFE". And starting on the 12th byte is the actual eddystone frame which is broken down into the following:

Frame Specification

Byte offsetFieldDescription
0Frame TypeValue = 0x10
1TX PowerCalibrated Tx power at 0 m
2URL SchemeEncoded Scheme Prefix
3+Encoded URLLength 1-17

The URL prefix have constant designated values:

URL Scheme Prefix

The URL Scheme Prefix byte defines the identifier scheme, an optional prefix and how the remainder of the URL is encoded.
DecimalHexExpansion
00x00http://www.
10x01https://www.
20x02http://
30x03https://

The URL Expansion also have constant values:
DecimalHexExpansion
00x00.com/
10x01.org/
20x02.edu/
30x03.net/
40x04.info/
50x05.biz/
60x06.gov/
70x07.com
80x08.org
90x09.edu
100x0a.net
110x0b.info
120x0c.biz
130x0d.gov
14..320x0e..0x20Reserved for Future Use
127..2550x7F..0xFFReserved for Future Use

And the remaining strings in url are converted to hex ascii codes. The URL is 17 bytes including the expansion value.

Here is the raw data from nRF Connect App:


And here is the actual raw data:


To Interpret the data
Byte offsetFieldValue
0Frame Type0x10 
1TX Power0x04 
2URL Scheme0x00 = "http://www."
3+Encoded URL0x06D696E65777465636807
The last 2 digits "07" is the URL extension for ".com"
0x06D696E657774656368 when converted to string is "minewtech". I used the foloowing website for the conversion:

http://www.unit-conversion.info/texttools/hexadecimal/#data

Combining the decoded data that we will get "http://www.minewtech.com"

Sunday, December 24, 2017

Google Nearby Troubleshooting Guide and the Minew Eddystones

This serves as a continuation of my post Google Nearby 101. As I have mentioned in my previous post, there are a bunch of cons that a developer should be aware of using Google Nearby. In summary, here are the cons:

  1. smartphone has to be connected to the internet
  2. the screen must be opened to receive the notification
  3. bluetooth and location services must also be turned on
  4. notification had no sound
  5. the notification disappears all by itself after 10 to 20 minutes(sometimes less than 2 minutes)
  6. once the notification is deleted, it will not reappear too soon because of google's standard notification backoff policy

One important information that I have not mentioned in my previous post although it is not con but it is very important is that the URL must be "https" other than this, the configuration will not work.

Knowing the cons can help in speeding up the development of Apps. Another important aspect to take note of is that the Nearby Service is not in the hands of developers and there are occasions when Google shuts down the service which may trick other developers which will make them think that Google NearBy is not stable. Based on my personal experience this is how I was able to determine that when my smartphone is not able to get the notification and the cause is that the Google Nearby Service is not running is as follows:

I used several apps to check if my eddystones are working like the following: 
  1.  Ibeacon Detector. This app when run in Android 6.0 shows the different frames coming from the eddystones by refreshing the screen each time it receives the new frame. If there is no new frame received, the screen does not refresh so I know when the eddystones is not working.
  2.  nRf Connect App. This app does the same thing as the Ibeacon Detector app but it identifies the frame type and shows each values it receives with proper labeling like the temperature, uuid, instance id, etc. so this is better the Ibeacon Detector App.
  3. BeaconSet+. This app shows all the frames it received and it does not refresh the screen. It will not be able to detect the eddystones if the datat it receives is incomplete.
 I use these 3 apps to confirm if the source of error is coming from the Google Nearby Service using the logic: "My eddystones are working but I am not able to receive the notification but I confirm that a few minutes ago, it was working fine."


The Hardware
For some other reasons, knowing better the Eddystone being used can also be very important. As a developer, your knowledge of how the eddystones work should be at leas above average or at least know more than the end-user. You should be very familiar how it operates and know when the battery is still fully charged.

The eddystones I am using(Minew I6 models) operates this way:

  1. Upon insertion of the battery, it goes to connectible mode for 1 minute. During this mode, it will not transmit the URL and TLM frames. 
  2. You can use the nRF Connect to configure the eddystones while in connectible mode.
  3. Google Nearby will not work during this 1 minute period.
  4. I determine if the battery charge is weak when I put 2 beacons in close range which will make them compete to get their signals be received by other devices, and the ones that loose is the one with weak battery charge. Although the measured battery charge level shown in nRF Connect can also be accurate.
For now, all of this information is based on my personal experiences which I am so willing to share.

Wednesday, December 20, 2017

Locating a Point Using 3 Beacons

Beacons can be used to track the movement of object on a given space like in our example, is perhaps a Fashion Store with a regular  rectangular shape. Assuming the object is a smartphone with a beacon app installed and has stable internet connection to transmit data back to the shop owner's back end app. These data will be the rssi(received signal strength) of each beacons received every 1 second.

The back end app by default, knows exactly the position of the three beacons.

So with these sets of data available, the location of the smartphone can be traced every second using trilateration algorithm which is a process of finding the location of the point using the geometry of circles, spheres and triangle. More information about trilateration is in wikipedia.

Using the rssi transmitted by the smartphone, and since we know the distance of each beacon from each other(d and e), we have a lot of data to use in determining the exact location of the point. We will also assume that all points of interest in the scenario lie on the same plane. The formula for computing distance in meters from  rssi is as follows:

RSSI = -20 * log10(distance in meters) + RssiAtOneMeter
distance in meters = pow(10, (RssiAtOneMeter - ReceivedRSSI) / 20)

source: Evaluation of the Reliability of RSSI for Indoor Localization

In the above picture, we can easily determine the value of x and y by Trigonometry's Pythagorian Theorem:


Using the eaquation:

x2+y2=b2


Sunday, December 17, 2017

Google Nearby 101

It has been a huge challenge for business owners how to get people download their apps so that they can send notifications containing rich information about their products, services and promotions. One of the best idea how to get people's attention is to send them notifications even if they have not downloaded the app. This is a good idea aside from hiring somebody to be stationed in front of the store to convince people download the app and giving away flyers. The advantage of the electronic form is that it can be done 24/7 all year round.

Google introduced sometime in 2016 the Physical Web integrated with Chrome Internet Browser and using Eddystones. But the transmission and detection is intermitent and unreliable so it did not became very popular. About 7 months ago(not so sure) Google introduced the Nearby Messaging Service to replace the Physical Web and I only got to know about this 3 days ago and since then, I had been experimenting with it. Based on my tests, this is more stable and reliable even though the greatest setback is that the smartphone has to be connected to the internet to retrieve information about the beacon and in order to receive the notification, the screen must be opened and bluetooth and location services must also be turned on. But at least the service is consistent and stable. I also noticed that the notification had no sound at least on my cherry mobile flare xl 2 and the samsung s8 which I experimented with at the concept store and the notification disappears all by itself after 10 to 20 minutes. I wonder why google did not made the notification the same as receiving an sms message. The aliexpress app had the same notification characteristics as the sms messaging. Or at least google provided a way to let users configure it that way. And lastly, do take note that once the notification is deleted, it will not reappear too soon because of google's standard notification backoff policy. I figured a way to make the notification reappear quickly by disabling - enabling the bluetooth service.

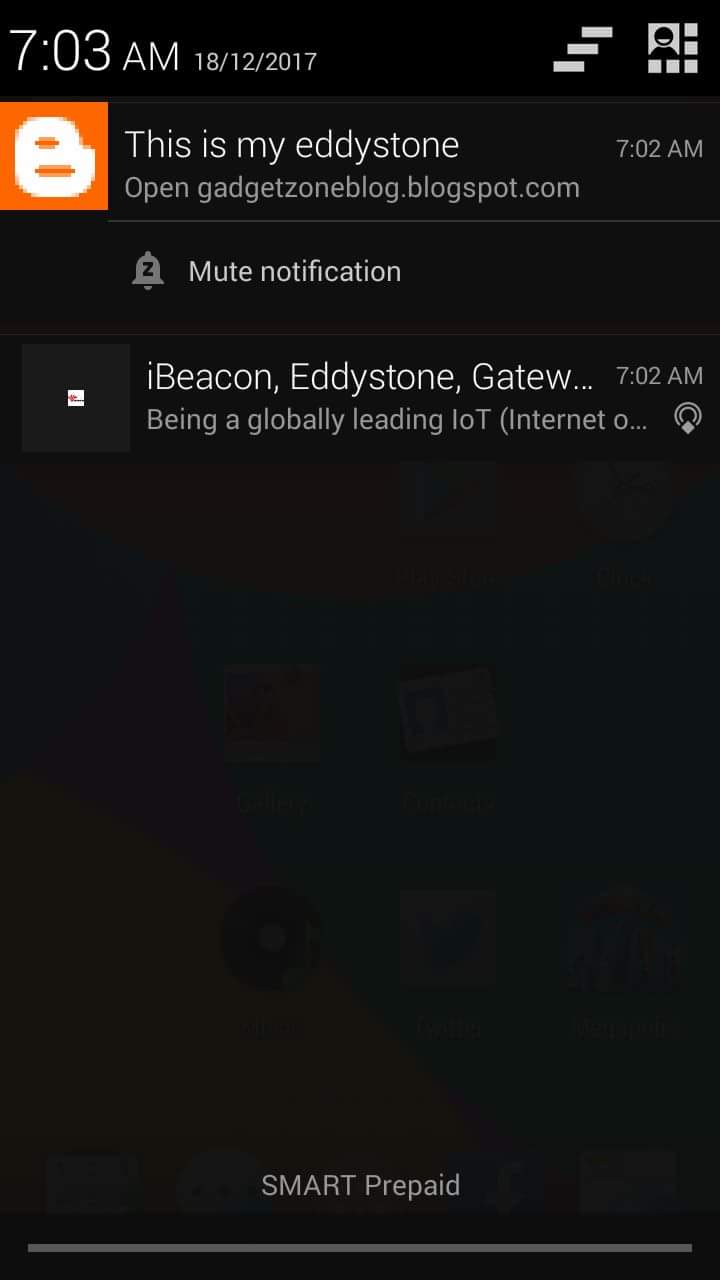
All android smartphones with at least KitKat(4.43) version had this Google Nearby. And are ready to receive the Eddystone signal. The photo below is the screenshot of my SKK Android Kitkat showing the notification from google nearby and the physical web software. Both notifications came from the same eddystone beacon. In this device, both google nearby and physical web are not reliable. I just forced both software to detect the beacon signal.


Here is how I made the google nearby worked:

1. I created a Google Cloud Platform Project. This should be easy because if you are in the Beacon Dashboard which can be found here link, The first screen will abvice you to create a project.:
And here is the project I created:

2. After you created the project, it will take you back to the first screen and click your project to select it.

3. Download the Beacon Tools app in Play Store to register the beacon. Open the app and it will ask you to choose your project. Just select your project and the next screen will detect your beacon unregistered. The screen shot below shows the Eddystone URL frame. This frame cant be registered in Google Nearby. Only the UID or EID frames are allowed which I already did. Just make sure that the eddystone is in connectible mode.


And here is the registered UID Frame:
And here is the registration screen:

I only populated the Description field and saved the registration on this android app.

4. I went back to the Beacon Dashboard and clicked on the project and it has taken me to the screen that lists all active beacons on that project.


5. I clicked the active beacon I registered in the Beacon Tools app, and has taken me to a screen that allows me to further configure the beacon:

In this screen, I populated all the fields and added just one property and went to the second tab(create attachment).


 Even though I had no idea what it is for, I just created a dummy data:

And here is the attachment I created:


And lastly, I created the Nearby Notification:


I saved the data I entered. My main objective here is to just send a notification message which when clicked, will open my blog to an internet browser on the smartphone.

And here is the final result showing the Eddystone URL link:


I have not explained in detail what each fields are for because I am also a beginner trying to make the Google Nearby work and so that I can check if it is stable and yes it was! There are other message types that will allow the user to open the app of the eddystone owner if it was already installed or will open the google play store which displays the app and the user will have to click the download button and install the app.

To complete my experiment, I went to a nearest Samsung Concept store and brought along my Eddystone to check if other android smartphones can detect the signal without doing any configuration and it was a success, I did not took any picture because I did not bring along my phone so that I can fully test it. Bringing along my phone could influence the result.

Conclusion:
I still see a lot cons than pros but the best part of it is that the service is very stable and reliable and google has solved the huge problem how to get people' attention to get them download the business owner's app.

Saturday, December 16, 2017

Ways Eddystones can help boost sales of Businesses

With the Philippines' growing economy, big retailers keeps on investing in huge malls all over the country leaving small players struggling to boost sales. This holiday season, employees has received their 13th to 14th month pay plus Christmas bonuses and have a lot of money to spend.

With this huge potential customers, capturing a small portion can make retailers earn more profits. Beacon technologies is new and most likely very few developers and business owners are aware of its existence. And because of this, if early adapters use the technology to attract more customers is one great advantage because of the following reasons:

1 Beacon Technology can deliver relevant information to potential customers at the right place and the right time.
2. Traditional Marketing tool have smaller conversion rate than Beacon Marketing Technologies.
3. Beacon Marketing Technology enhance customers shopping experience by introducing new payment methods and helping them get the information they need with incredibly rich content and carefully designed website and video.
4. It can prevent customers frustrations when they cant find the products they need by sending them forms that will enable them to list those products and retailers can inform when the product is already in stock in invite them to come back.

I end this post with a sample news report featuring the beacon technology:


Digital Passes Issuance App with Eddystone

Digital Passes although not widely used in the Philippines can be a great tool to lure more customers or reach more customers that can not be reached by traditional forms of marketing tools. And with the help of eddystones, you can promote your products 24hrs a day or even when you go to a party. I have made a post explaining in detail what digital passes are(Pass2U Pass Issuance Service Integrated with Ibeacons).


As we all know, eddystone signals can be detected by any smartphone when the Physical Web is enabled in that smartphone. So in this case, we can develop a webpage that can generate a digital pass(like a discount coupon or an event) so that when the owner of that smartphone clicks on the link displayed on the physical web screen, it will automatically download the digital pass.

This marketing tool can be effective if the eddystone is placed along the highway or you may always carry it along with you so even if you are not saying anything about your business, people will still get know about it.

Friday, December 15, 2017

Developing Eddystones App In Android

Eddystone beacons is google's answer to Apple's Ibeacon. Both devices use BLE technology but differ in advertising protocols.

Ibeacons transmit a single frame wherein the Ibeacon identifier bytes is at the 8th and 9th byte of the frame. See picture below as seen on Ibeacon Detector app on android:

And a more detailed data structure of the frame is below:


In comparison, Eddystones transmit 3 frames which is like below:
As an evidence, if you use Ibeacon Detector App to detect the Eddystones, you will notice that the data packets received always changes that is because eddystones transmit 3 frames.

I have previously developed an android app to scan ibeacons (A Simple Ibeacon Scanner App in Android) and this app can be slightly modified to scan for eddystones as well by removing the validation that look for "0215" pattern in the frame and look for valid values to identify the frame type as described in the last picture.

A lot of people ask, why do we need eddystones since we already have ibeacons? The answer is obvious, eddystones is able to transmit more data than ibeacons. Ibeacon frame contain only the RSSI, UUID, Majo and Minor. The latter 3 is used to identify the ibeacon, while the eddystones frames contain the TX power, Temperature, URL, Battery Charge Level, Instance Id, Namespace Id, and many more.

Monday, November 20, 2017

I repaired my Micro M3d Printer

It was more than a year ago when I bought my very first 3d printer to try if the technology really works as I have seen on youtube. During that time, it was the cheapest 3d printer available(not the diy type).

During the first few days, I had very good experience with it, no wastage, all printed objects were perfect. Then when I decided to print a chopping board that would take 34hours to print and left it printing while I went to work. When I came back in the afternoon, to my surprise and dismay, it failed and it continued to print but no filament is coming out. That is weird. All the happy days with the printer became a constant nightmarish struggle just to succeed in printing. It even came to a point where the heating element was destroyed and negotiated with M3D to repair it but they came up with having the entire unit be replaced with a new one, but the new replacement had also the same problem. That was really weird.

I got fed up and decided not to use it anymore and that when I will have a time to go over it again, I had to tear it apart to check what controller they used. Not until last Sunday when I decided to repair it. I first downloaded the latest version of the software and during the first run, it asked me to update the firmware, so I updated the firmware and try to print the wheel used in a mars rover. To my surprised, the printer output was fairly solid, this is the first good output it ever produced so I thought maybe there is nothing wrong with the hardware, it was just the firmware that made all that troubles.

I thought that was the end of the problem, but when I tried to print the same object, the x-axis slowly shifted to the right. I tried other settings but yielded the same result. It was not brittle but the x-axis keeps on shifting to the right, weird!

I concluded that it is not the hardware that is making all these mess, it was the software and the firmware. So I tried to look for alternative to use other software and I succeeded, Adafruit had an article wherein they used raspberry pi and octopi. I tried it, and so far, I am getting good result. Octopi uses Cura engine which is used by Ultimaker.

So far this is the 3d printer busy printing the mars rover wheel:

Another good thing about using octopi is that I dont have to connect my laptop to the rpi all the time so while the rpi is busy printing i could use my laptop developing the accounring software and play dota.

Tuesday, October 3, 2017

Spindle Upgrade Project

The spindle that came with the cnc I just got is small, good enough to cut even a 12mm thick acrylic which is awesome because laser cutters requires 100w to cut acrylic this thick. But for me it is not powerful enough because I am planning to use the cnc as production machine for my air purifiers si I need to upgrade it and I found a suitable dremel class hand tool which can be bought cheaply at local hardware.

It is perfect since the tip of the hand tool is threaded so that means I can create a custom bracket having the same diameter as the original spindle and I will attach it to the cnc with no problem.

So I had to buy aluminum block (50mmx50mmx50mm) and off I go to my favorite machine shop to have it done perfectly. And with a few discussions with the machinist, he was able to execute the task perfectly and here is the result:

but when I tried to tighten the clamp to its maximum, the spindle still moves but I don't blame the machinist since I was the one who said the diameter should 45mm, but I was able to solve easily by wrapping the bracket with scatch tape and the problem was solved:
SO I test it further while moving the z-axis upwards, it wont go up to 30mm because the custom bracket was too thick it acts as a barrier so, tomorrow I will go back to have it fixed, it was still my fault, hehe here is the problem area:
Another problem I encountered is that as the rotation speed reaches 12000 rpm, the attached endmill begins to wiggle so I still need to fix it:


Monday, September 25, 2017

I got a new CNC and I made a simple spindle dust hood

I have bought a mini desktop CNC. I need this CNC because I have sold the big cnc I had and planning to put an air purifier business but to make 1 air purifier, I would need a casing and to make a casing, I need laser cutting services which is very expensive so if I have my own small cnc, I could bring the price so low that I could beat the branded air purifiers not just in terms of very effective air cleaning but the pricing as well.

Ok, that solves my problem, and yes it can cut acrylic, but to use it, requires devices and add-ons to protect the cnc itself and prevent dust from flying all over my tiny place, that's why I came up with the idea of creating at least a dust hood for the spindle.

All the dusts and forces that makes the scatter and fly over the place is at the spindle, so having a dust hood at this area of cnc can help solve the problem by 90 to 100% .

Here is the cnc with my old raspberry pi 2:

My original plan was to use the cnc with the raspberry pi 2 and make a casing similar to this:

but the raspberry pi was very slow in transmitting gcode to the cnc so I scrapped the idea.

I started the project(making a dust hood for the spindle) last Sunday, and I was able successfully created a simple dust hood which is like below:


It passed all my tests, it can prevent dusts from flying and scattering all over the place. Efficiency is at 85% but installing and uninstalling is not easy and very inconvenient, so I separated the attachment and brush holder and went to a nearby machine to have them tapped and the result was awesome but very expensive. The machinist charged me Php800 but I haggled until we agreed at Ph600 which is still very expensive.


Here is the much closer look the new dust hood:

Saturday, September 16, 2017

New Air Purifier Designs and with Extensions

It has been over a month since my last post and during that span of time, I have made several iterations in the design and I even made an industrial class version but it failed because I am trying to copy what others are doing(currently available air purifiers in the market). But I will tell the reason why it failed at last part of this post.

The iterations I made so far and it seems the final version already is that I made it smaller, I used lower powered but bigger cpu fan. I like the bigger fan because it has bigger blades and with bigger blades, it can suck in air more easily on a wider area, I sacrificed the higher power to get rid of the noise. And the last revision I made is to glue all parts except the door for changing the filters and removing the bag of activated carbon. I also got rid of using multi-filters because those unnecessary filters were useless, I found this out during my testing of the industrial grade air filter I made. So now, I only use hepa filters. These filters can remove particulates in the air even those PM2.5 class particulates where harmful chemicals and air borne viruses and bacteria belongs.

I also added a third motor which can be detached from the fan when not needed. This third motor will allow the air purifier to catch more air as far as 3 meters so that means the space that it can help clean was widened from a mere 18sqm to about 25-30sqm.

Here is the new air purifier:


Here is the extension module:
Here is the industrial grade air purifier:


The design failed because of only 1 reason: it does not have enough activated carbon in it and most of the air wont pass through the activated carbon. It is also very expensive.

My original design was very effective at removing air particulates and odors because the air has to go through a very thick layer of activated carbon which is about 50mm thick and there is a chamber where the air goes and will not have a choice but to go up and pass through the activated carbon.

Saturday, July 29, 2017

My Air Purifier just got a second motor

I could not just wait for the air to come into my air purifier just to be cleaned. I needed a way to somehow force the surrounding air to be pushed inside it to be cleaned. So the only option I had in mind is to add a second motor to suck in the air. And here it is:


With this design however, my air purifier is no longer cheap because the materials I used for the casing has been doubled, 1 motor and 2 extra brackets plus the top cover not to mention, I already use 100% activated carbon because it is really 5x more efficient than ordinary charcoal.

Here is the actual result of my design:

I also noticed that the air being sucked in may not penetrate the inner portion of the activated carbon inside the eco bag, so I customized the bag itself to have a hole at the center located in front of the motor that sucks in the air. Which is like the one shown below:


So in this case, the air will not just go around the bag but will be pushed inwards at the center of the bag living no choice but the air will be pushed right into the activated carbon.

And here is the actual device itself:

My testing shows that as I blow smoke directly into it, 90% of the smoke gets sucked in immediately which is an indication that air cleaning is very efficient.

Future plans:
I am thinking of adding another chamber as the final stage air cleaning but that depends on the performance of the device, for now, I am so happy with the result because it is very efficient.

Saturday, July 22, 2017

Adding Air Filter to my Air Purifier Project

I was too busy this weekend to pay attention to my supposed Wall Décor Weekend Project, and instead, my attention is focused on adding an air filter to my air purifier diy.

I have spent several days searching for a reliable seller of air filters and inquired at leading industrial suppliers, but as it turned out, these industrial suppliers are also manufacturers of industrial grade air filters so they snub small time buyers like me. But assuming they grant my wish to buy small piece of their product, still they insist to custom build the air filter with frames and their minimum thickness is about 1" which is too much for a small air purifier like what I did. But yes, I really like the HEPA air filter they are selling because it is the world's most efficient air filter.

I haven't gave up on them yet, coz I'm so crazy about their HEPA air filter, but it is nice to have, but with the kind of supplier, well, oh well, I am still hoping that I could find one and instead I ended up with air condition air filter. It is a 3M brand called "Filtrete" .


One particular feature of this product is it cleans the air and very efficiently because it used electrostatic fibers which act like magnets to trap dust, bacteria, dust mite, and many harmful dust particles. Here's the actual air filter:
The package recommend just one layer but I used 2 layers. SO that makes 4 layers of air filters inside my air purifier. Why 4 layers?

4 layers because I used eco bag to wrap the charcoals and activated carbon so that makes it 2, then I added 2 layers of Filtrete so that makes it 4:


Wednesday, July 19, 2017

My Next Weekend Project: Wall Decor

I am not really an art lover, but somehow each time I walk into a shop, the first things that catch my attention are the things I see on the wall, somehow those objects tells more of the place and how different the shop is and gives the customer a feeling of confidence that they came to the right place and would entice them to buy. In the house, usually objects on the wall are usually about the object that may tell something about the personality of the person living in it. But this time, I have chosen this object:
For me, this exotic design gives a relaxing feeling, it is usually found in Budhist temple where it is so quiet and peaceful. It is not about my personality, it is how I want the place should be.

I will using a 12mm thick MDF which is 425mm by 425mm.